 |
 |
|
 |
 |
 |
 |
 |
 |
 |
 |
 |
 |
 |
 |
 |
| |
 |
62 CADILLAC DRIVESHAFT REBUILD |
| |
| The discrepancy:
When shifting from reverse to drive a loud clanking sound is heard.
Upon driveshaft inspection, found the original non greaseable
factory u-joints installed.
The odometer reads 97097 miles on 7/14/09.
That's USA quality! |
| Corrective action:
Jack up the car and place it on four jack stands. |
It's important to keep it level. Less transmission fluid will be lost
when pulling the front yoke out.

|
| When you pull the driveshaft out of the transmission you will need to protect
the front yoke.
To prevent damage to the yoke, tape a rag around it and place rags on the
driveshaft tunnel openings.
Place an oil drain pan to catch the transmission fluid under the tail shaft.
Remove the two center bearing support bolts and shims on the bottom
of the tunnel.
Bend the locking tabs on the differential u-bolt nuts and remove u-bolts.
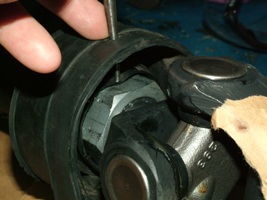
Remove the driveshaft from the differential yoke by pushing it forward.
If stuck, place a screwdriver between the yoke and u-joint for leverage.
Lower the driveshaft and pull it out of transmission.
With the yoke protected slowly pull it through the tunnel. |
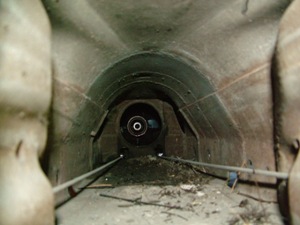
Driveshaft tunnel
with the driveshaft removed. Vacuum out the
47 years of dirt accumulation. |
This shaft is balanced as a unit. Before disassembling the shaft you want to
mark the alignment of the yokes.
I used an automatic centering punch. Placing one mark on the yoke and one
on the shaft.
The first part of disassembling the driveshaft starts with removing the internal
locking "C" clips.
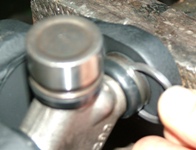
Use a pick to clean off the grease and dirt build up. Then look for the side that
has a bigger gap between the clip and driveshaft.
With a screwdriver to pry them off.
Wearing Safety glasses is a must.
They will spring and bounce across the shop. |
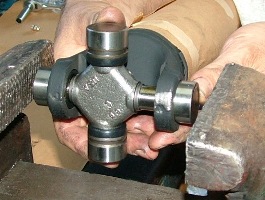
With the clips removed you can press the u-joints
out. If you're lucky enough to have an press, That's great.
Using two sockets: One that is just wide enough to let the cap slide into
and one small enough to fit into the driveshaft opening,
you can use a vise. 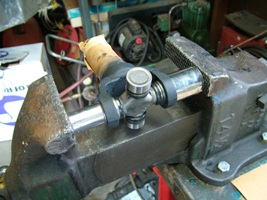 This does take some dexterity and a third hand.
Since the position of the vise doesn't allow support from the table, I clamp a 4"
vise grip to the table for support. This does take some dexterity and a third hand.
Since the position of the vise doesn't allow support from the table, I clamp a 4"
vise grip to the table for support. 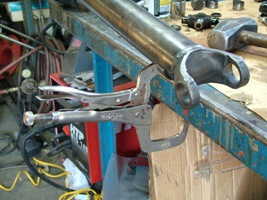 By tightening the vise you're squeezing the u-joint to one side.
After the one side bottoms out.
Release the vise and pull the cap off. You might need a vise grip to
rotate the cap a little.
With the cap off switch the position of the sockets and squeeze the other
cap off.
With both caps off tilt the u-joint and remove. By tightening the vise you're squeezing the u-joint to one side.
After the one side bottoms out.
Release the vise and pull the cap off. You might need a vise grip to
rotate the cap a little.
With the cap off switch the position of the sockets and squeeze the other
cap off.
With both caps off tilt the u-joint and remove. |
|
|
| This is the sequence of disassembly:
1) Front yoke from driveshaft.
(To prevent any damage)
2) U-joint from front yoke
3) Center u-joint from aft shaft
4) Center u-joint from slip yoke
5) Rear u-joint |
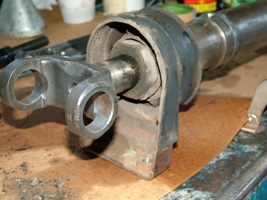 |
Broken down into sections
you can now remove the
center bearing.
Pull the slip yoke out until it bottoms
on it's stop. Pry the nut locking
ring back. |
In order to remove the 1 and 13/16ths nut, I had to make a wrench. I cut the
front one inch off of a socket with a high speed cutter.
Then welded it to some 3/8 plate. With a torch I
cut the silhouette and 1/2" drive receptacle. Then ground the edges
with an electric hand grinder and hand file.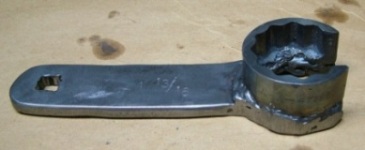 I call my home made tool company
The Frankenstein Tool Works LLC.
"Big, strong, and ugly, but they
work" is my slogan. I call my home made tool company
The Frankenstein Tool Works LLC.
"Big, strong, and ugly, but they
work" is my slogan. |
Place a six inch 1/2" drive extension into the driveshaft and clamp it in the vise.
This will keep it from moving around. 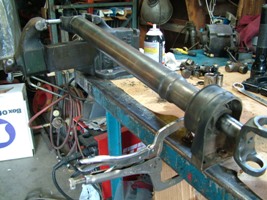 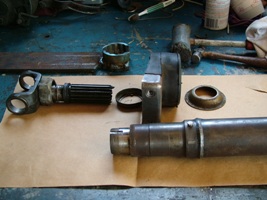 Loosen the nut completely and slide out the yoke. Remove the lock ring and wiggle
the bearing support and grease slinger off the shaft. Remove the snap ring and
tap out the center bearing from the support. Loosen the nut completely and slide out the yoke. Remove the lock ring and wiggle
the bearing support and grease slinger off the shaft. Remove the snap ring and
tap out the center bearing from the support. |
Once disassembled, I cleaned/polished the shaft with a 9" course wire wheel. 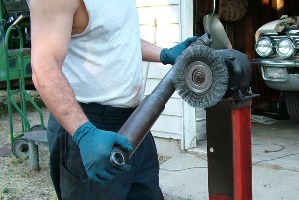 Don't Polish The Transmission Yoke or Slip Yoke Machined Surfaces. Don't Polish The Transmission Yoke or Slip Yoke Machined Surfaces. |
| The hardest part was cleaning the inside on the slip yoke receptacle.
I filled it with parts cleaner solvent and let it soak for a half hour.
After removing the plug and flushing it, I still had to manually clean it with rag
and screwdriver.
I degreased the parts with brake cleaner and taped off the machined
surfaces.
Then evenly sprayed it with two coats of flat black paint.
Why Flat Black? Because that's what I had on the shelf. |
| Sequence of assembly:
1) Center bearing
2) U-joint on slip yoke
3) Center bearing on shaft
4) Insert slip yoke
5) U-joint on tranny yoke
6) Tranny yoke on shaft
7) U-joint on aft shaft
8) Slip yoke to aft shaft |
Press new center bearing into support and install snap ring.
It doesn't matter which side of the bearing goes on first. 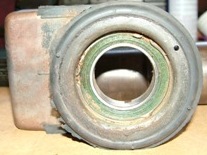 |
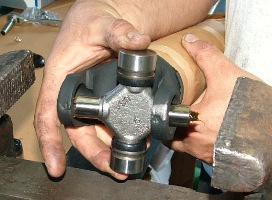  |
| Install the u-joint on the slip yoke. The zerk fitting for greasing
should be facing aft. Don't install the zerk fitting until the whole shaft is assembled.
Remove two caps and install into yoke.
Place the caps on the ends of yoke and squeeze in the vise.
Care must be taken to prevent dislodging the
needle bearings inside the caps.
While tightening the vise make sure that the u-joint is free to move.
Use the sockets to adjust for "C" clip
installation. If you have one "C" clip installed and the other cap won't squeeze any more, you're crushing
a needle bearing. Take it apart. Wear safety glasses when installing "C" clips they will spring across
the shop. |
| |
 Here's the math:
(TA) / (A+B)= T1 Here's the math:
(TA) / (A+B)= T1
T = Actual torque value
A = Torque wrench length
center of handle to center of drive
B = Adapter length
center of socket to center of drive
T1 = Corrected torque value |
| Slide the grease slinger, bearing support, and locking ring
onto the shaft. Grease the slip yoke andreceptacle
splines.With the plug removed slide the slip yoke into shaft
and torque nut to 55 ftlbs.
Since my Frankenstein tool is 6" long, I need to adjust the torque.
(55x18)/(18+6)= 41.25 ftlbs See above formula.
Install a temporary zerk fitting into plug hole and grease slip yoke
until some grease exits the shaft. Remove fitting and push the slip yoke about an
inch inward squeezing out some grease.
Install plug.
Don't bend locking ring until driveshaft is completely assembled. |
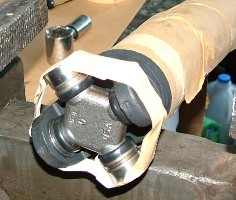
| Install u-joint on transmission yoke with zerk fitting facing aft.
Match up the marks on the driveshaft and install transmission
yoke onto shaft.
Remember to protect the machined surface on the yoke. I rapped it with
brown paper before painting and that will stay on until insertion into
the transmission. |
| Install u-joint on aft shaft. The zerk fitting should be facing forward.
Install all four "C" clips and rap tape around the u-joint to prevent
the caps from falling off. |
  |
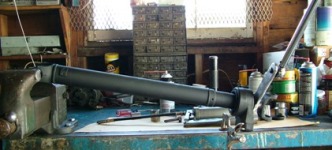
| Since the driveshaft is too big and painted nicely. After matching up the
alignment punch marks I used a big clamp to assemble both halves on the bench. |
| Do a final inspection to make sure all the locking "C" clips are installed and
that the zerk fittings are facing in the correct direction.
Install the zerk fittings and grease the front and center u-joints. |
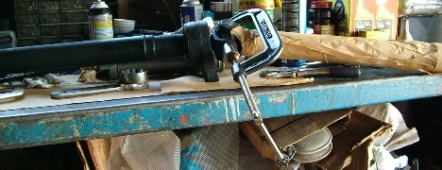
| Place a punch through the
hole in the center
bearing support to bend the
lock ring onto the
slip yoke retaining nut.
You're ready to install it
on the car.
OK! I know! What about
spin balancing?
If it's not wobbling with all that
grease and dirt
on it. It's not going to wobble
all clean and new.
(IMHO)
I've had two driveshafts
balance and all
they did was take
my money. |
 |
| Slide the driveshaft through the tunnel. Then remove the protective
covering on the transmission yoke and lube with transmission oil.
Slide it into the transmission.
Line up the center bearing support and install bolts and shims.
Torque to specs. (3/8 24 grade 5 would be 35 ftlbs)Install aft u-joint into differential
yoke with the "C" clips resting on the differential yoke flanges.
Then torque u-bolts to 15 ftlbs. Bend the locking tabs. Grease the u-joint and
you're done!
I'd like to say you're good for another 97,097, but they don't build them like
that anymore. |
| Show your support for The Poorman's Off Chassis Restoration.com.
Purchase a T-Shirt today. |
| |